
10 Steps to Implementing Salesforce Communities
- 28
- January
- 2014
Salesforce Communities are a great way for businesses to connect with their customers, partners and employees. They help in sharing information easily, and by setting up specific communities to serve different needs, it allows the company not only to reduce costs but also to increase engagement by listening to the people who are important to its success.
In this post, we outline how a business can undertake a basic Communities Implementation on Salesforce using 10 simple steps.
1. Enable Communities
The first step in implementing a community on Salesforce is to enable it. Before doing this, you need to check if your company has the Communities license, which can be verified by clicking on Company Profile> Company Information from the Setup tab and going through the licenses listed at the bottom of the page.
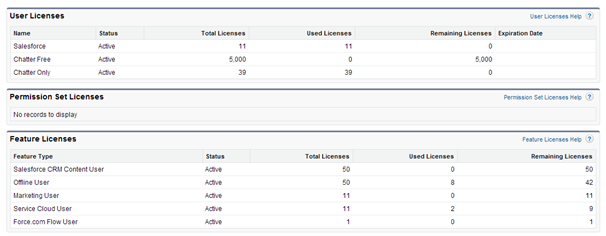
Once you’ve verified that the license is available, go to Customize> Communities> Settings and click on Enable Communities.
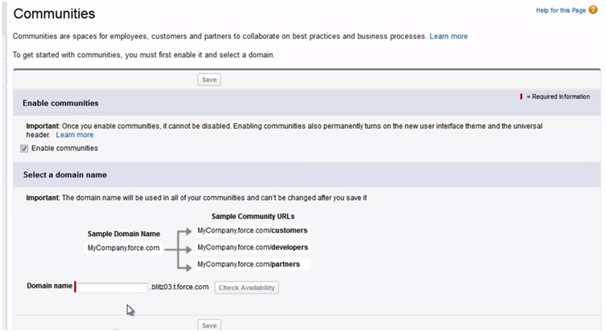
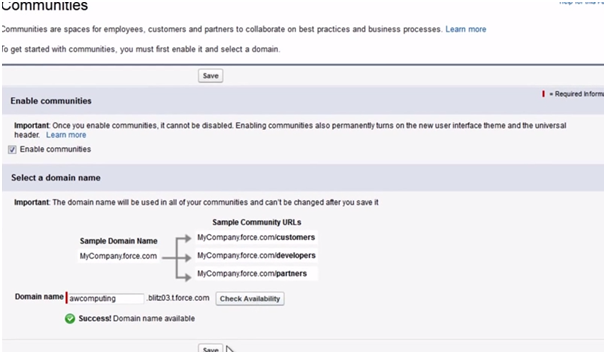
Next enter a Domain name for the company’s communities and click on Check Availability to make sure that it isn’t already taken. Although all the business’ Salesforce Communities will have the same domain name, you can customize it by creating a unique URL for each one.
E.g.: domain name/support for Customer Support.
2. Create the Community
The next step of Communities Implementation is creating the community. Enter a suitable name for the community, followed by a short description of it, and then enter its customized URL. Click Create when you are done.
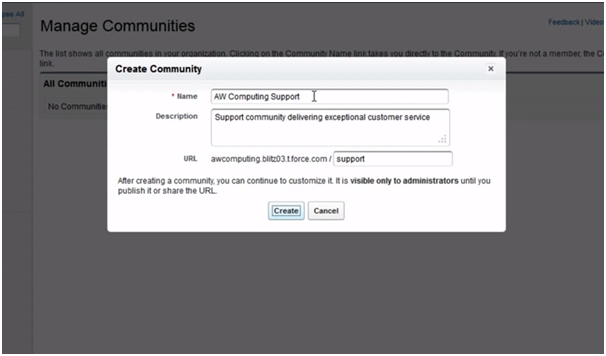
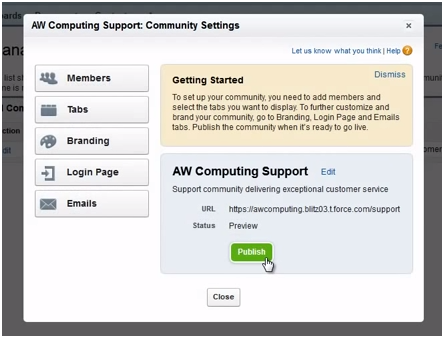
The community page is now in preview mode, which means you can continue to edit it while it’s visible only to administrators. It will go live only once you Publish it or share the URL.
3. Add Members
In this step, you will need to add members to the Salesforce Communities by selecting their profiles and defining permission sets that allow certain categories of employees to access each community.

4. Add Content
Besides the Chatter tab, from the menu you can choose other tabs that are relevant to your community. For instance, for a Customer Support Community adding a tab Cases, where customers can register their issues and another tab for FAQs, which can help customers find solutions for their problems without lodging a formal complaint, is vital to Communities Implementation.
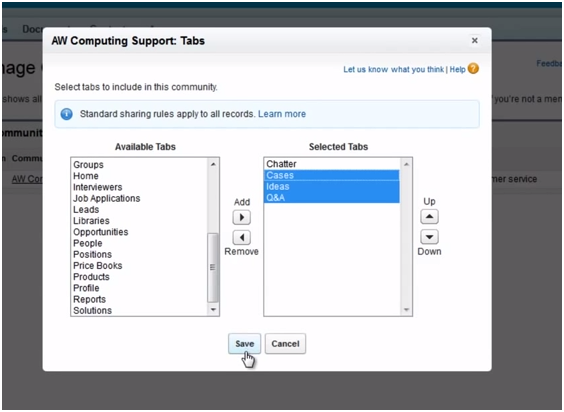
The category that is on top of the list of selected tabs (usually Chatter) will automatically be the landing page, so toggle this according to your needs.
5. Add Branding to the Community Page
You can try to extend your company’s branding to the community page by uploading the logo and tag line into the header and footer tabs. Similarly, you can select the color that ties in with the one used by your company across its branding elements.
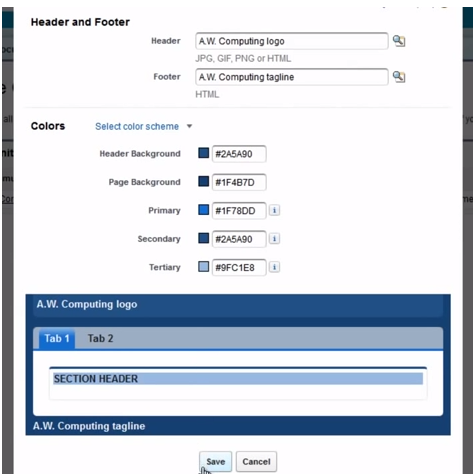
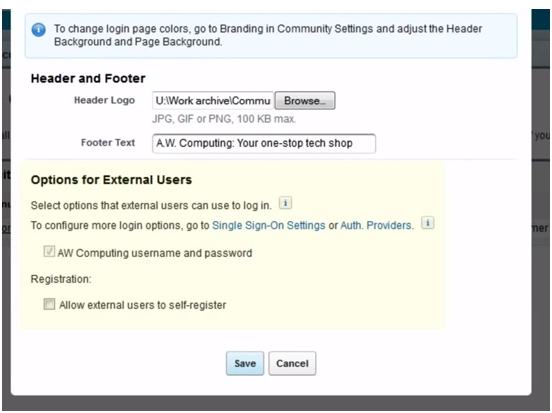
6. Customize the Login Page
Besides uploading branding elements such as the Company logo on the login page, you can also customize login options such as allowing customers to sign in through SSO providers such as Facebook or through self-registration.
7. Configuring Emails
In this step, you can customize the email setup for your Salesforce Communities by adding a generic email address, branding elements and the company address on the footer of the email message.
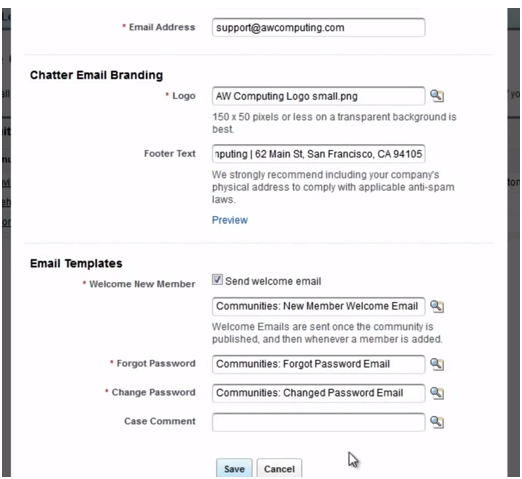
This completes the basic process of setting up a community page.
8. Preview the Community
Switch from the community setup page to the Salesforce Communities page by clicking on the top left corner of the screen. Verify that all the elements are as you want them to be.
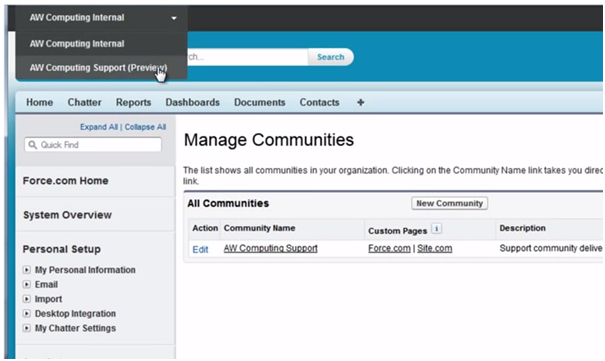
Preview the customer login page by going back to the community setup page, clicking on the members setting tab and copying and pasting the community URL to a browser page.
9. Get Feedback
The next step in Communities implementation is sharing the preview with key internal players and getting their feedback before publishing it. You can do this by posting the URL on the internal Chatter and selecting the people you want to share it with such as managers, moderators and executives.
10. Incorporate Changes and Publish
Make the necessary changes to the Salesforce Communities page based on the feedback, and you’re ready to roll it out. Click on Publish, and it’s done!
CM-Focus is a Software Consulting Services company based in San Francisco Bay Area. The company assists organizations with Salesforce Communities Implementation that help in reducing costs on support services as well as in maximizing ROI on CRM initiatives.


Recent Posts
- Account Based Marketing – How Is It Different, and What Are The Best Tactics?
- Add new licenses or cancel subscription for Leadpal appexchange product
- Salesforce to Quickbooks integration options
- Online Salesforce Apex and Visualforce Development Trainings
- Merge and Auto Convert of leads into existing Accounts based on Rules : LeadPal
Archives
- September 2015
- July 2015
- May 2015
- April 2015
- March 2015
- February 2015
- November 2014
- October 2014
- July 2014
- June 2014
- April 2014
- March 2014
- January 2014
- December 2013
- November 2013
- October 2013
- September 2013
- August 2013
- July 2013
- December 2012


